How to Repair a Front Door?

A front door should close with a quiet click, not scrape the threshold or let a cold draft curl around your ankles. Those small clues often point to repairable problems: loose hinge screws, worn weatherstripping, a shifted strike plate, or swelling near the bottom edge. The U.S. Department of Energy’s Energy Saver guidance estimates that air leaks can account for 25% to 40% of the energy used for heating and cooling in a typical home. That figure covers the whole home, not the front door alone, but it shows why a careful inspection matters. Small gaps can affect comfort and energy use.

This guide explains how to diagnose common front door repair issues, choose practical fixes, and recognize when a damaged frame or door needs professional attention. Building-science educator Allison Bailes writes about airflow and moisture control, both relevant to door performance. I cannot verify a verbatim Bailes quotation specifically about front door repair, so I won’t invent one. The practical principle is simple: “Find the source of the leak before choosing the fix.” Treat that as a summary, not his exact words. A rushed repair can hide the symptom while leaving the cause untouched. Check the door’s movement, seals, hinges, and frame before buying parts. Sometimes the fix is only a longer screw. Sometimes it isn’t.
How to Repair a Front Door?

Assess the Front Door’s Damage and Identify Its Material

Before repairing a front door, inspect it in daylight and note where the damage sits. Check both faces, the edges, hinges, frame, and threshold. A thin line of light around the closed door may point to a poor fit, not a damaged panel. Look for loose hinge screws, cracks, dents, peeling finish, or soft, darkened wood. Press questionable wood gently; softness can signal rot. Don’t pry at it. A sagging door may come from worn hinges or a shifted frame, so the panel itself may not be the problem. Small clues matter.

Identify the door material before choosing a repair. Wood often shows grain and may swell or split; steel can feel cool and may have rust beneath chipped paint. A magnet can help distinguish steel from other materials, though hardware nearby can mislead you. Fiberglass may have a molded grain or a smooth, plastic-like surface. I’ve mistaken a painted surface for solid wood before, so check an exposed edge if possible. If damage reaches the core, glass, or frame, get an experienced repairer to assess it.

Tips: Take clear photos and measure the damaged area. Keep the door dry, and avoid sanding or filling until you know its material and finish. A quick patch can hide the real cause.


How to Repair a Front Door: Assess Damage and Identify Its Material

Start by checking for swelling, soft spots, cracks, peeling finish, and loose joints. Identify the door material before choosing a repair: a magnet typically sticks to a steel skin, visible grain often indicates wood, and fiberglass may have a molded grain pattern without magnetic attraction. For a wood door, a moisture meter can help assess damp areas.

These are indicative screening references for wood, not universal pass-or-fail limits: outdoor conditions and climate affect normal moisture levels. Readings around 20% or higher can indicate conditions favorable to decay, so investigate the source of moisture and check for soft or deteriorated wood. Do not apply these wood readings to steel or fiberglass doors.

Gather the Tools and Safety Equipment Needed for the Repair

A front-door repair goes more smoothly when the tools match the problem. Set out a tape measure, pencil, screwdriver, hammer, and level before removing anything. A cordless drill can help with stubborn screws, but use a hand screwdriver near worn screw holes. Keep wood shims nearby for checking alignment, and have sandpaper and wood filler ready for small surface repairs. Not every sticking door needs trimming; humidity can make a door swell temporarily.

Protect yourself and the entryway. Wear safety glasses when drilling, sanding, or tapping loose hardware. Use work gloves when handling splintered wood, but keep them away from rotating drill bits. A dust mask helps when sanding old paint or filler; stop if you suspect hazardous material beneath the surface. Lay down a drop cloth to catch dust and metal pieces. If the door must come off its hinges, ask another adult to support its weight. Doors are awkward. Keep the doorway clear, and place removed screws in a small container so they do not disappear underfoot. A slightly imperfect fit can be frustrating, so check the door’s swing with the level before making irreversible cuts.

Repair the Door Surface, Frame, or Hardware

A front door may look damaged while the real fault sits in its frame or hardware. Close it slowly and inspect the gap around the edge. Uneven spacing can point to loose hinges, a shifted frame, or a swollen door. Check the latch, too. If it catches, tighten hinge screws before trimming the door; removing wood too soon can leave a permanent gap.

Check the gap. A strip of paper trapped between door and weatherstripping can reveal weak contact when it pulls out easily.

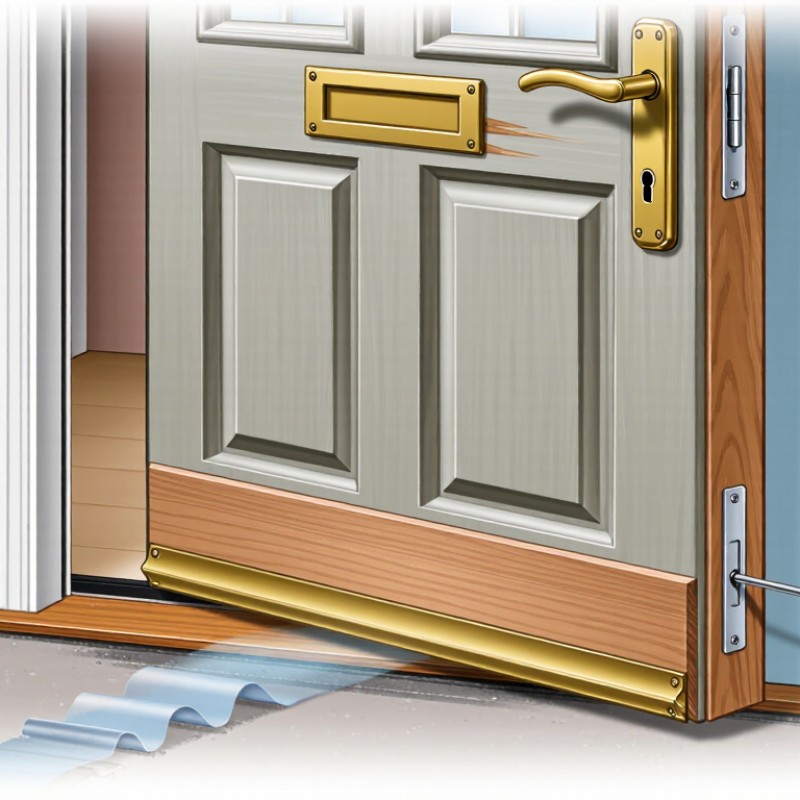
For surface damage, remove loose paint, fill small dents, and sand only after checking the coating, especially on older doors. Use an exterior-rated filler and paint, and let each layer dry fully. A rushed patch often shows through. For drafts, replace flattened weatherstripping and adjust the door sweep so it touches the threshold without dragging.

The U.S. Environmental Protection Agency estimates that combining air sealing with insulation can reduce heating and cooling costs by about 15 percent; that is a whole-home estimate, not a door-only promise. If the frame is soft, cracked, or damp, investigate moisture before covering it.

Test the repair on a rainy day. A little air can still sneak through.

Restore Weatherstripping and Refinish Repaired Areas

After repairing a front door, replace worn weatherstripping before refinishing the affected area. Close the door on a strip of paper; if it slides out easily, the seal may be too loose. Check the hinge side, latch side, and threshold, where daylight or a thin draft can reveal gaps. Choose weatherstripping that compresses gently without making the door difficult to latch. EPA’s ENERGY STAR home-upgrade guidance estimates that air sealing and insulation can reduce household energy costs by an average of 11%. That estimate covers the home, not one door, so treat it as context rather than a promised saving.

For a wood door, remove loose finish around the repair and smooth rough edges with fine-grit sandpaper. Wipe away dust, then apply a compatible exterior primer and finish in thin coats. Keep paint off the weatherstripping and hardware. Let each coat dry fully; rushing can leave tacky spots or trap marks. A small test patch helps reveal color differences before you coat the whole repaired area. Match the existing sheen, but expect older finishes to look slightly different. I would inspect the seal again after the first cold or rainy week; a neat repair can still miss a stubborn draft.

How to Repair a Front Door? — Restore Weatherstripping and Refinish Repaired Areas
Stage Task Materials and Tools Method Typical Time Quality Check
1. Inspect Locate drafts, damaged seals, and finish defects. Flashlight, paper strip, gloves Check the door perimeter, corners, threshold, and repaired areas. Close the door on a paper strip; noticeable resistance when pulling it out suggests contact at that point. 10–20 minutes Identify gaps, loose or brittle weatherstripping, peeling finish, and any soft or visibly damaged wood.
2. Remove old seal Clear worn weatherstripping and residue. Putty knife, pliers, mild cleaner Pull out old compression seals or sweep material carefully. Scrape away adhesive without gouging the door or frame, then clean and dry the surface. 15–30 minutes The mounting surface is clean, dry, and free of loose material.
3. Prepare repaired area Make small surface defects ready for refinishing. Scraper, sandpaper, exterior wood filler if needed, dust cloth Remove loose paint or finish. Fill small, stable dents or holes with a filler suitable for exterior use, following its label for application and drying. 20–45 minutes, plus drying Do not cover soft, rotten, or structurally damaged wood with filler; repair or replace damaged material first.
4. Sand and clean Smooth the patched area and prepare it for coating. Medium- and fine-grit sandpaper, dust mask, tack cloth Once filler is dry, sand it level with the surrounding surface. Feather the edges of the existing finish and remove all sanding dust. 15–30 minutes The repair feels smooth, and the surface is clean and dry before coating.
5. Refinish Protect and blend the repaired area. Exterior primer when required, compatible exterior paint or clear finish, brush Apply primer if required by the repair material or coating instructions. Apply thin, even coats of a finish compatible with the door’s existing coating; allow the stated drying time between coats. 30–60 minutes of work, plus drying Coating is even and fully dry before the door is closed against seals or exposed to weather.
6. Install perimeter seals Replace weatherstripping along the jambs and head. Compatible compression weatherstripping, scissors or utility knife, measuring tape Measure each side separately. Cut the seal to length and install it according to its design, keeping it continuous at corners and avoiding excessive compression. 20–40 minutes The door closes and latches without undue force, and the seal contacts the door evenly.
7. Adjust the bottom seal Reduce the gap beneath the door. Door sweep or threshold seal, screwdriver or drill, measuring tape Choose a sweep compatible with the door and threshold. Position it so the flexible edge lightly contacts the threshold, then fasten it as directed. 15–30 minutes The sweep does not drag heavily, block normal opening, or leave a visible gap when the door is closed.
8. Test and maintain Confirm the repair and check it periodically. Paper strip, flashlight Close the door and repeat the perimeter check. Recheck after the finish has cured and inspect seals periodically for looseness, compression, or cracking. 5–10 minutes The door operates smoothly, seals make consistent contact, and no draft or light is visible through the repaired gaps.

Test the Door’s Fit, Security, and Operation

Before repairing a front door, test how it fits and moves. Close it slowly and watch the gap around the frame. A consistent gap is useful; a tight spot near the top may signal sagging hinges. Check whether the latch meets the strike plate without lifting or pushing the door. Try the handle several times. It should move smoothly, and the door should close without a hard slam. Look for daylight, worn weatherstripping, or fresh scuffs along the jamb. Small clues matter.

Tips: Use a flashlight to spot light leaks. Place a thin strip of paper between the door and seal, then close the door. If it slides out easily, that area may need adjustment. Test gently; forcing the door can hide the real problem.

Check security as well as convenience. With the door closed, pull lightly near the handle and inspect whether the hinges, latch, and frame feel firm. Tighten loose hinge screws with a hand screwdriver, but stop if the screw holes are stripped or the frame is cracked. A longer screw may help when it reaches solid framing, though placement matters. I might be tempted to adjust the latch first; that is not always the answer. Recheck the door after each small change, including its clearance at the floor. If the frame shifts or the lock still fails to engage, get a qualified repair professional to assess it.

Questions? Give Us A Call!