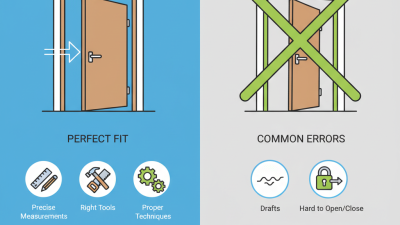
A front door does more than welcome visitors. It helps control drafts, moisture, noise, and access to your home. Yet even a high-quality door can perform poorly when its frame is out of square or its threshold is set incorrectly. Small gaps matter. You may notice them when cold air slips past the latch or rain gathers near the sill.
This guide explores ten practical front door installation tips, from measuring the rough opening to checking the finished swing. Accurate measurements come first; compare the opening’s width and height at several points, since older walls are rarely perfectly even. A level, shims, suitable fasteners, and careful sealing all play a role. Follow the door manufacturer’s instructions, especially for flashing, drainage, and hardware placement. These details vary by product and can affect both weather resistance and warranty coverage.
Take your time. Before fastening the frame, test that it is plumb and square, then open and close the door several times. It should move smoothly, without scraping the floor or bouncing away from the weatherstripping. A neat bead of exterior sealant can help block water, but it cannot correct a poorly fitted frame. That distinction is easy to miss. If the opening shows rot, movement, or significant unevenness, pause and seek qualified help rather than hiding the problem. The tips ahead offer a clear checklist for planning the work, avoiding common mistakes, and knowing when careful preparation is not enough.

Before selecting a front door, measure the opening at several points. Check the width near the top, middle, and bottom, then measure the height on both sides. Walls and frames can shift over time. Use the smallest measurements when comparing door sizes, and note whether you are measuring the existing slab or the rough opening. They are not the same.
Look closely at the jamb, threshold, and surrounding trim. A door that fits the opening may still bind if the frame is out of square. Check for soft, damp, or cracked wood, since a new door will not fix a damaged frame. Measure the available depth, too, especially if the wall is unusually thick. Small details matter. Record the direction the door swings and make sure it will not hit a nearby wall, railing, or light fixture.
Consider the doorway’s exposure before choosing materials and features. A sunny, rain-facing entrance may need different weather protection than a sheltered porch. Check the threshold height and the clearance below the door; even a small gap can invite drafts or water. It is tempting to trust a common size and order quickly. That can be an expensive guess. Recheck your notes, and if the opening looks uneven or the measurements conflict, ask an experienced installer to assess it before purchase.
Before removing an old door, read the installation instructions for the exact door type. Keep them nearby; details such as hinge placement and fastener length can vary. Gather a tape measure, level, drill, screwdriver, utility knife, shims, safety glasses, and a helper. You will also need the specified screws, flashing, and exterior sealant. Check that the new unit, frame, and opening are dry and free of visible damage. Measure the opening in several places. Measure twice. Then check again.
Tip: Lay tools and materials on a clean drop cloth, grouped by task. Confirm that the door swings the right way before lifting it into position. A level and shims help keep the frame square, while temporary support prevents it from shifting. Don’t guess at fastener sizes; use the instructions. Small differences matter.
Keep the printed instructions open as you work, and follow the sequence rather than relying on memory. Install flashing and sealant where specified, without blocking drainage paths. Test the door before finishing: it should open smoothly, latch without force, and leave an even gap around the edges. If the frame twists or the opening feels unstable, pause. A quick adjustment may not fix a damaged or uneven opening, and pushing ahead can create a draft or sticking door. Recheck your measurements and seek qualified help if the cause is unclear.
| Step | Installation Tip | Tools and Materials | Installation Instructions and Checks |
|---|---|---|---|
| 1 | Measure the opening before ordering | Tape measure, level, notepad | Measure the width at the top, middle, and bottom, and the height at both sides and the center. Check the rough opening, wall depth, and swing direction. Confirm the required opening size and clearances in the door manufacturer’s installation instructions. |
| 2 | Gather tools and protect the work area | Safety glasses, work gloves, pry bar, drill or screwdriver, shims, utility knife, drop cloth | Have the tools and specified fasteners ready before removing the existing door. Protect floors and nearby finishes. Exterior door units can be heavy, so arrange help when lifting and positioning the unit. |
| 3 | Inspect and prepare the rough opening | Level, framing square, straightedge, repair lumber | Remove loose debris and check that the framing is sound, square, and reasonably plumb. Correct damaged or uneven framing before installation; the door frame should not be forced into a distorted opening. |
| 4 | Install sill flashing or a sill pan | Sill-pan flashing or compatible flashing membrane, sealant as specified, scissors or utility knife | Prepare the threshold area according to the door and flashing instructions. Fit the sill protection so water can drain outward, and seal or lap flashing layers in the direction required by the installation details. |
| 5 | Dry-fit and orient the prehung door | Helper, level, shims | Set the unit into the opening without fastening it and confirm the exterior side, hinge side, threshold position, and swing. Check that the frame has clearance and that the threshold sits evenly on its support. |
| 6 | Center, level, and plumb the frame | Level, shims, tape measure | Position the frame in the opening. Level the sill and check both jambs for plumb. Add shims where needed, keeping the frame straight rather than twisting it; follow the unit’s instructions for support locations. |
| 7 | Fasten through shimmed locations | Drill or screwdriver, specified screws or fasteners, shims | Fasten the jambs at the locations recommended by the manufacturer, using shims behind fastening points. Tighten carefully so the fasteners secure the frame without bowing it or creating uneven gaps. |
| 8 | Check operation before adding insulation | Level, screwdriver, additional shims if needed | Open and close the door several times. Check that it swings freely, latches properly, and has consistent gaps around the slab. Adjust the frame or shims before proceeding if the door rubs, binds, or will not latch. |
| 9 | Insulate and seal the perimeter | Low-expansion window-and-door foam or suitable backer rod and sealant | Fill the space between the frame and rough opening using materials suitable for doors and the wall assembly. Follow product instructions and avoid overfilling, which can bow the jambs and affect door operation. |
| 10 | Finish the trim and test for weather protection | Exterior-grade sealant, trim, fasteners, utility knife | Install interior and exterior trim as appropriate, and seal exposed exterior joints while keeping intended drainage paths clear. Test the latch, deadbolt, threshold contact, and weatherstripping; repair gaps or leaks before considering the job complete. |
Removing the old door carefully protects the framing you need to reuse. Take off the interior trim with a thin pry bar, easing it away from the wall in small steps. Remove hinge pins, support the slab, then cut through paint or sealant before loosening the jamb. Wear eye protection; old fasteners can snap. Don’t rush this part. A bent jamb can disguise rot or a poorly sized opening.
With the frame exposed, check the sill, studs, and header for soft wood, staining, or movement. Probe suspicious areas with an awl, and replace damaged material before installing anything new. Measure the opening at the top, middle, and bottom, plus both diagonals; uneven readings can signal a twisted frame. EIA’s 2020 Residential Energy Consumption Survey identifies space heating as the largest residential energy end use, at roughly 42% of site energy. That figure is not a door-loss estimate, but it underscores why a sound, sealable opening matters. Follow the door system’s installation instructions and ASTM E2112 guidance for exterior-door installation, including appropriate flashing and drainage details. I would recheck the sill level before ordering: it is an easy step to skip, and a costly one to regret.
Before fastening the new frame, check the rough opening for rot, protruding nails, and an uneven subfloor. Measure width at the top, middle, and bottom, then compare both diagonals. A difference between diagonals can signal a racked opening. Dry-fit the frame, leaving space for shims and low-expansion foam. Small errors matter.
Set the hinge jamb first. Check its face and edge with a level, then shim behind each hinge and near the latch strike. Secure it with screws that reach the framing, tightening gradually to avoid bowing the jamb. Check the reveal gaps before adding trim. A door can look square and still bind. Check it twice. The 2021 International Energy Conservation Code lists a 0.5 cfm/ft² air-leakage limit for tested swinging doors; locally adopted requirements may differ. The U.S. Energy Information Administration’s 2020 Residential Energy Consumption Survey reports that space heating accounted for 42% of U.S. household site energy use, making a continuous perimeter seal worth checking.
Tip: Close the door on a strip of paper at several points around the frame. Similar pull resistance suggests even compression; adjust the shims if one edge slips freely. Test the latch repeatedly, too. A small adjustment now can prevent a sticky door later.
A dependable installation starts with a square, stable frame. Check the opening in several places; older walls are rarely perfectly straight. Set the door with shims near the hinges and latch, then fasten it according to the door maker’s instructions. Do not overtighten screws, which can pull the frame out of alignment. Before sealing, open and close the door several times. It should swing freely, meet the weatherstripping evenly, and latch without force. A small gap may seem harmless. Later, it can become the draft everyone notices.
Tips: Seal the interior and exterior edges with materials suited to the gap and climate. Use low-expansion foam around the frame, keeping it away from moving parts. Apply exterior sealant neatly, but leave any designed drainage openings clear. Check the sill for a continuous seal. These details are easy to rush, and worth a second look.
Finish by trimming excess shims and fitting the casing without covering drainage paths. Seal exposed cut ends where appropriate, and remove dust or old caulk before applying new sealant. Let coatings and sealants cure for the time stated on their labels. Then test the lock, latch, and weatherstrip again. If the door binds after fastening, pause and correct the frame; adding more sealant will not fix poor alignment. A careful final check catches small problems before they become costly repairs.